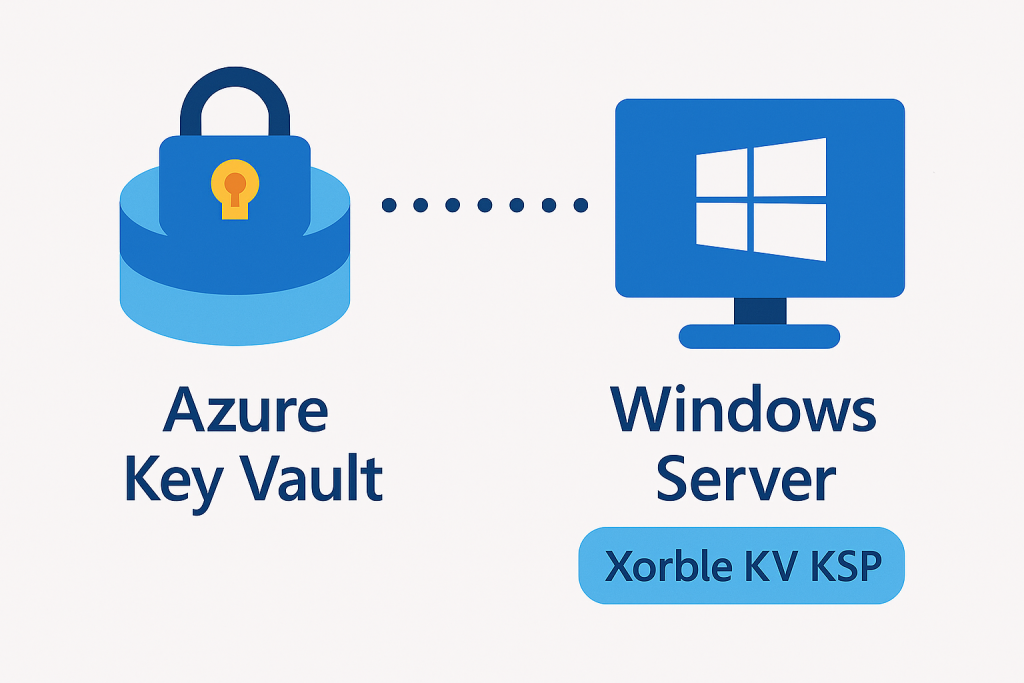
To use the Xorble KVKSP, an Azure Key Vault needs to be created for storing keys and certificates.
Normally, for each server, there will be a single Key Vault for storing key material. Each Key Vault has a unique name based on the Identity of the server. Additional Key Vaults can be added storing keys associated with different users or service accounts if required.
It is expected that in most scenarios only a single Key Vault per server will be used.
Configure the Key Vault Name
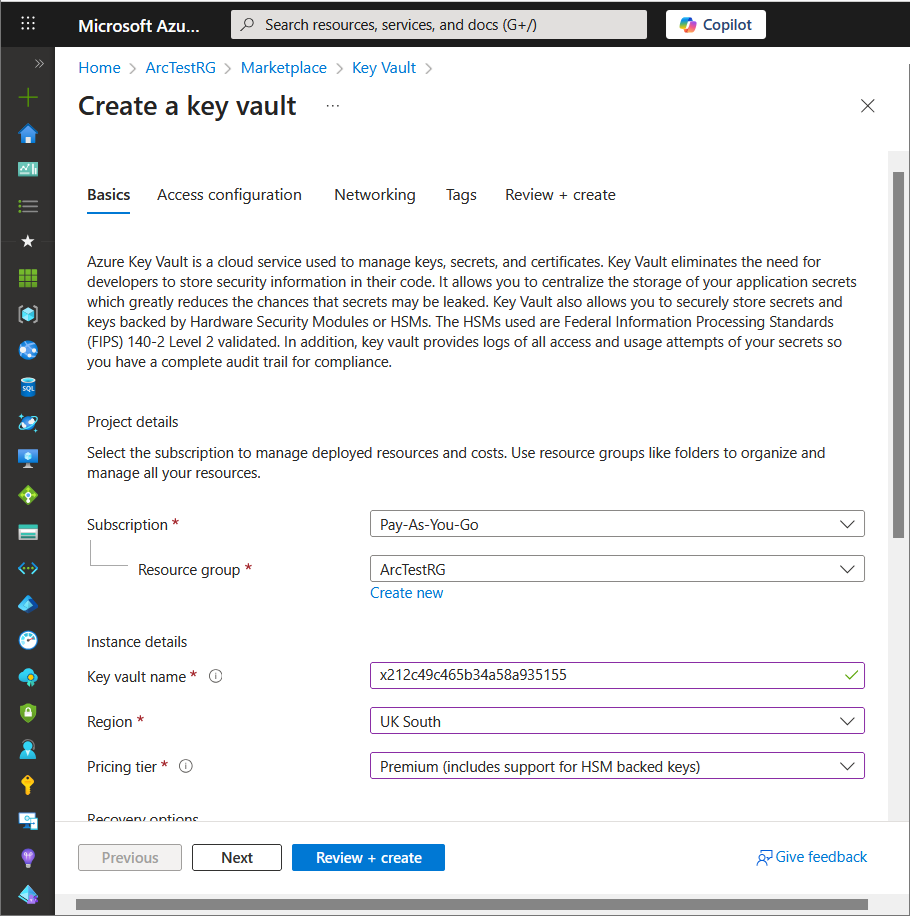
A new key vault will be created for each server that is to use the KSP – the default Key Vault name used by the KSP is based on the GUID of the identity used to access the Key Vault prefixed with the character “x” followed by 23 characters of the GUID with the all the “-” characters removed.
The Key Vault name is therefore a total of 24 characters and statistically will always be a unique name.
Hence for a server with MSI GUID of “212c49c4-65b3-4a58-a935-155f76f003c7” the Key Vault name would be “x212c49c465b34a58a935155”.
Azure Key Vault Premium and Standard
In order to have HSM backed keys you MUST create a Premium Key Vault. Key Vault Standard uses software backed keys rather than HSM backed keys.
The KSP will always attempt to create an HSM based key but if this is rejected (http 403 error) then the creation operation will be retried with a software key based request. This is potentially useful in testing scenarios as non HSM Keys incur less cost than HSM ones.
The Key Vault should be created within the same region as the VM or for Azure Arc based workloads as close geographically to the server as practical for performance reasons.
Networking Considerations for Azure VMs
If the Key Vault is to be used by an Azure VM, then the Key Vault should ideally be configured to use a Service Endpoint so that it is only available on the Subnet/VNet of the VM and Internet access to the vault should be blocked.
By using a Service Endpoint, access to the vault is limited to only virtual machines the specified Subnet(s).
Similarly, for Azure Arc based deployments, the machine should have private connectivity to the Key Vault.
Authenticating to the Key Vault
Azure Key Vault uses Entra (previously Azure Active Directory) as its the source of authentication and hence for every server created there will be a separate security principal created within Azure. Authentication to Entra from the KSP can use one of the following methods:
- Managed Service Identifier (MSI) for Azure VMs
- Managed Service Identifier (MSI) for machines with Azure Arc agent
- Service Principal and Key
For Windows Virtual Machines running in Azure, the default will be to use MSI based authentication as that typically provides the strongest security and is the easiest to configure.
By default, the KSP will use the Managed Identity (Azure VM or Arc) without additional configuration. To use a service principal and secret you need to configure the KSP with these values. The KSP will store the secret in an encrypted blob but this mechanism is generally not as secure as using a managed identity and the secrets will in most environments need to be updated on a regular basis.
Authentication and the Key Vault Name
By default, the Key Vault name used by the KSP is derived from the GUID of the identity used to authenticate to generate a unique Key Vault name.
The name of the Key Vault is generated by appending the first 23 characters of the principal GUID after removing the ‘–‘ characters to the string “x”.
This approach allows Key Vault names to be determined automatically by the KSP based solely on the identity GUID, and as GUIDs are randomly generated, there is almost no chance of a naming collision.
From a Terraform file, you can generate the key vault name using the following approach:
name = “x${substr(replace(azurerm_windows_virtual_machine.kv-ksp-test.identity[0].principal_id, “-“, “”), 0, 23)}”
As an alternative, the Key Vault name used can be based on the fully qualified domain name of the server (converted to lower case, with “.” characters removed and truncated to 24 characters). This requires a registry change on the server so is generally not recommended.
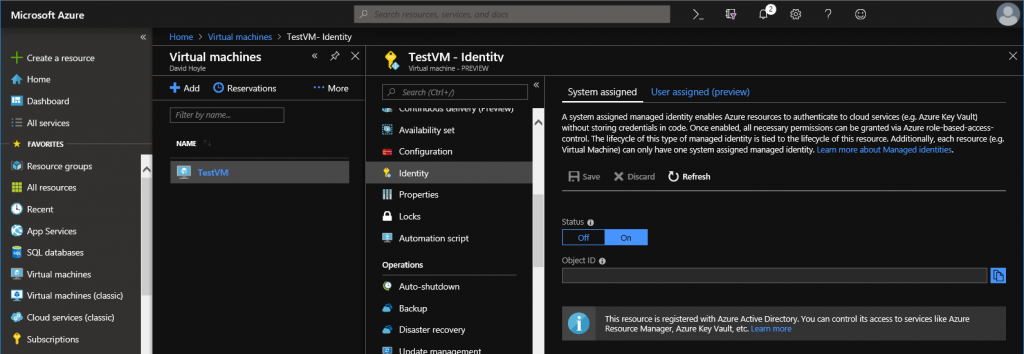
Creating the MSI based Service Principal
To create an MSI based Service Principal, simply enable the System Assigned Identity as shown below in the Azure Portal:
More details on the use of MSI can be found at the following location:
Computers with the Azure Arc agent, the identity is automatically created as part of the Arc agent installation.
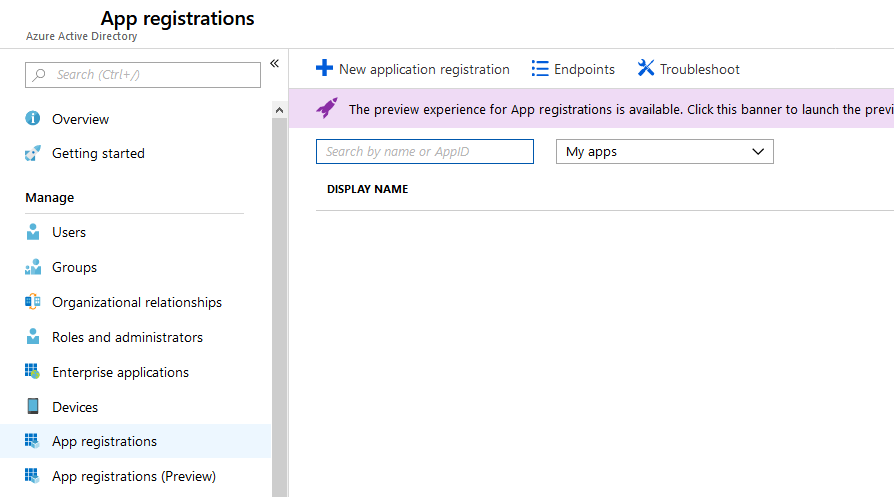
Creating a non MSI Service Principal
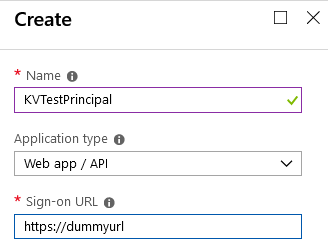
Open the Azure portal and select Azure Active Directory and then select App registrations as shown below. Then select New application registration:
Enter a name for the Service Principal and a dummy URL (this will not be used).
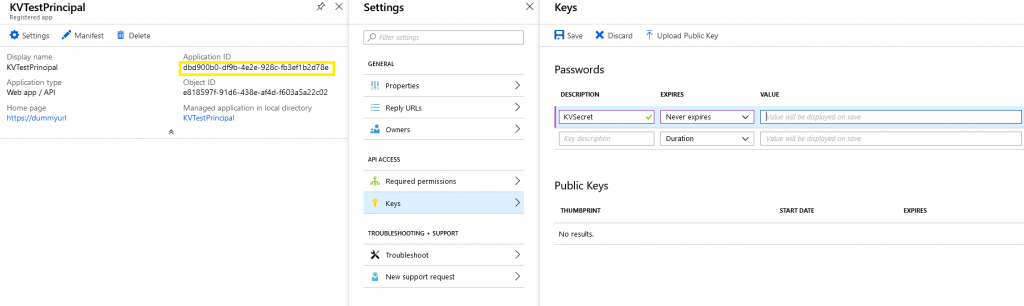
A new Principal will be created with a Client Id as shown in yellow below. A Secret Key will be needed for the principal.
Select Settings and then Keys and then enter a Description, Expiration Date.
When the Password (Secret) is saved it will be displayed – Make sure to copy the secret to use later.
Setting Key Vault Permissions
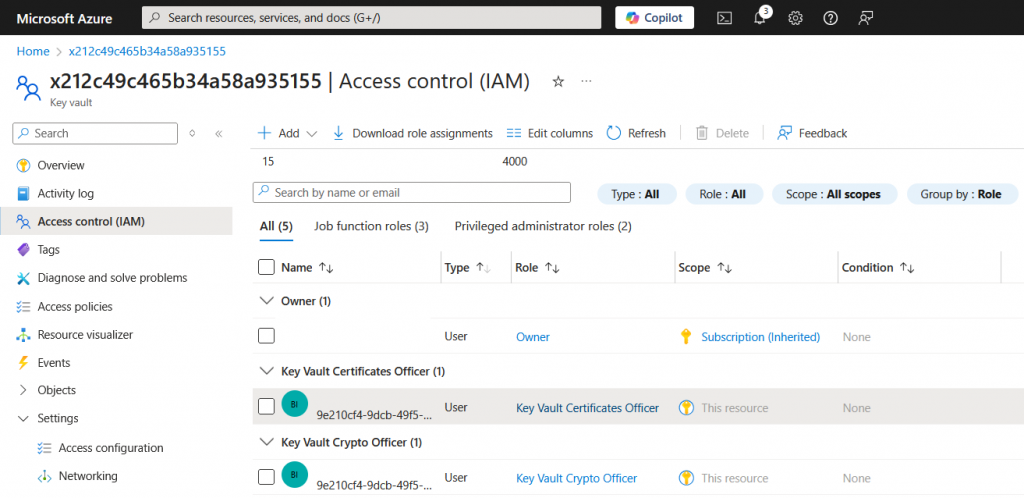
The Key Vault Access Policies will need to be updated to allow the above Security Principal (either MSI of non MSI) to be able to perform certificate/key operations.
Select the Access Control (IAM) on the Key Vault, select Add new and then add the Security Principal and give Key Vault Certificate Officer and Key Vault Crypto Officer Roles as shown below:
Automating Key Vault Creation for Azure VMs using Powershell
If you have a number of existing VMs that you want to enable to use the KSP then you can use PowerShell to speed up this process. The following script first enables the VMs within a Resource Group to use a System Assigned Identity.
After setting an Identity on each VM, it then creates the Key Vaults with the correct name and these are created with a service endpoint on the Subnet of the VM so public acces to the Key Vault is not needed.
The script finally sets permissions on the Key Vault for the VM.
# Variables
Set-AzContext -Subscription “Pay-As-You-Go”
$resourceGroupName = “rg-XYZZY”
$location = “UK South” # Choose your preferred location
foreach ($vm in Get-AzVM -ResourceGroupName $resourceGroupName ) {
Write-Output $vm.Name;
$vm.Identity = @{ Type = “SystemAssigned” }
# Update the VM configuration with the new identity
Update-AzVM -ResourceGroupName $resourceGroupName -VM $vm
}
foreach ($vm in Get-AzVM -ResourceGroupName $resourceGroupName ) {
Write-Output $vm.Name;
if ($vm.Identity) {
$keyVaultName = “x” + $vm.Identity.PrincipalId.replace( “-“, “” ).SubString(0,23); # Must be unique across Azure
$keyVault = Get-AzKeyVault -VaultName $keyVaultName -ErrorAction SilentlyContinue
# Retrieve the network interface associated with the VM
$nicId = $vm.NetworkProfile.NetworkInterfaces[0].Id
$nic = Get-AzNetworkInterface -ResourceId $nicId
# Get the subnet ID
$subnetId = $nic.IpConfigurations[0].Subnet.Id
# Get the VNet ID from the subnet ID
$vnetId = (Split-Path $subnetId -Parent)
# Retrieve the VNet object
$vnet = Get-AzVirtualNetwork -Name $vnetId
$subnet = $vnet.Subnets | Where-Object { $_.Id -eq $subnetId }
$serviceEndpoint = “Microsoft.KeyVault”
$current = @()
if ($subnet.ServiceEndpoints) {
# .Service holds strings like “Microsoft.Storage”
$current = $subnet.ServiceEndpoints.Service
}
if ($current -notcontains $serviceEndpoint ) {
$current = @($current + $serviceEndpoint)
}
$vnet = Set-AzVirtualNetworkSubnetConfig `
-VirtualNetwork $vnet `
-Name $Subnet.name `
-AddressPrefix $subnet.AddressPrefix `
-ServiceEndpoint $current `
-NetworkSecurityGroup $subnet.NetworkSecurityGroup `
-RouteTable $subnet.RouteTable `
-Delegation $subnet.Delegations
# Persist changes to Azure
$vnet = Set-AzVirtualNetwork -VirtualNetwork $vnet
if (-not $keyVault) {
$ruleSet = New-AzKeyVaultNetworkRuleSetObject -DefaultAction Deny -Bypass AzureServices -VirtualNetworkResourceId $subnetId
New-AzKeyVault -ResourceGroupName “$resourceGroupName” -VaultName $keyVaultName -NetworkRuleSet $ruleSet -Location $location -Sku “premium”
$keyVault = Get-AzKeyVault -VaultName $keyVaultName -ResourceGroupName $resourceGroupName;
}
# Get the Key Vault and set permission on it.
New-AzRoleAssignment -ObjectId $vm.Identity.PrincipalId -RoleDefinitionName “Key Vault Administrator” -Scope $keyVault.ResourceId -ErrorAction SilentlyContinue
New-AzRoleAssignment -ObjectId $vm.Identity.PrincipalId -RoleDefinitionName “Key Vault Certificates Officer” -Scope $keyVault.ResourceId -ErrorAction SilentlyContinue
}
}
Automating Key Vault Creation for Azure Arc using Powershell
If you are using Azure Arc and have a number of existing machines that you want to enable to use the KSP then you can use PowerShell to speed up this process.
The following script enumerates Azure Arc machines within a Resource Group and creates the Key Vaults with the correct name based on the identity of the machine.
The script does not add private endpoints to the Key Vaults which typically would need to be done in order to keep communications over private networks.
The script finally sets permissions on the Key Vault for the machine.
# Variables
$resourceGroupName = “ArcTest”
$location = “UK South” # Choose your preferred location
foreach ($machine in Get-AzConnectedMachine -ResourceGroupName $resourceGroupName) {
Write-Output $machine.Name;
$keyVaultName = “x” + $machine.IdentityPrincipalId.replace( “-“, “” ).SubString(0,23); # Must be unique across Azure
$keyVault = Get-AzKeyVault -VaultName $keyVaultName -ErrorAction SilentlyContinue
if (-not $keyVault) {
# Create the Key Vault
New-AzKeyVault -ResourceGroupName $resourceGroupName -VaultName $keyVaultName -Location $location -Sku “premium”
$keyVault = Get-AzKeyVault -VaultName $keyVaultName -ResourceGroupName $resourceGroupName
New-AzRoleAssignment -ObjectId $machine.IdentityPrincipalId -RoleDefinitionName “Key Vault Administrator” -Scope $keyVault.ResourceId -ErrorAction SilentlyContinue
New-AzRoleAssignment -ObjectId $machine.IdentityPrincipalId -RoleDefinitionName “Key Vault Certificates Officer” -Scope $keyVault.ResourceId -ErrorAction SilentlyContinue
}
}